
At-Home Bodyweight Booty Workout

Bodyweight Booty Workout
This workout will take you about 20 minutes to complete (10 minutes each cheek). If you want to make it harder, wear ankle weights. I used a Gymboss Inteval Timer to keep track of the time for this one, but you could also just watch the clock.

RIGHT GLUTE
There are two sections on the right side. Complete section 1 and then move immediately onto section 2 with minimal rest in between.
SECTION 1 | TABLETOP
You’ll complete each exercise for 20 seconds, moving from one right to the next. Go through the circuit of exercises three times total. If you need to rest, take a 20-second breather after each of the three rounds.
- Fire Hydrant | Start on your hands and knees in a tabletop position, hands stacked under shoulders, knees stacked under hips. Keeping your right leg in that 90-degree angle, lift that knee out and up in a wing motion (like a dog lifting to take a pee), opening up at the hip. Bring it back in close to the starting position, but try not to fully rest the knee back on the floor. As you do these, pay attention to your core: You want a straight spine, protecting the low back by pulling your abs in tight the whole time.
- Fire Hydrant Kicks | Hold your leg at the top of your last fire hydrant and from there, bend and straighten from the knee, kicking your leg out to the side and keeping it lifted at hip height (or as close to hip height as you can).
- Straight Leg Lateral Lifts | Get on your hands and knees in a tabletop position, hands stacked under shoulders, knees stacked under hips. From here, bring your right leg straight out to the right side. Lift it up a couple inches so that it’s hovering off the ground. This is your starting position. From here, lift the right leg up as close to hip height as you can (it’s tough!) and slowly lower back down to a hover. As you do these lifts, try to avoid shifting all your bodyweight into that opposite left side—instead of leaning in the opposite direction as the right leg lifts, you want to keep your body in a centered tabletop. A good way to achieve this is to lift the opposite, left hand off the ground (it’s also more challenging this way).
- Straight Leg Back Lifts | Same as the exercise before except your leg is no longer out to your side; it’s straight back behind you, lifting up and lowering down.
- Donkey Kicks | Start on all fours: knees stacked under hips, hands stacked under shoulders. From here, you’re going to press the bottom of your right foot up towards the ceiling, squeezing that right butt cheek. Pause at the top and then lower down most of the way (don’t let the right knee come to rest on the floor). As you do these, keep a straight spine by engaging your abs, pulling the belly button in towards the spin (this will protect your low back).
- Angled Donkey Kicks | I have to clarify that in the pictures my foot is pointed, but these are better with a flexed foot. Sorry! These are just like donkey kicks except you’re lowing the knee in towards the other knee and then pressing the foot up and out to the side. You should feel these in the side of your butt.
SECTION 2 | BRIDGE
You’ll complete each exercise for 20 seconds, moving from one right to the next. Go through the circuit of exercises three times total. If you need to rest, take a 20-second breather after each of the three rounds.
*Important: You’re still working the right side—make sure you don’t switch over to the left yet. Right foot should be planted firmly on the ground as your base leg for all these moves.
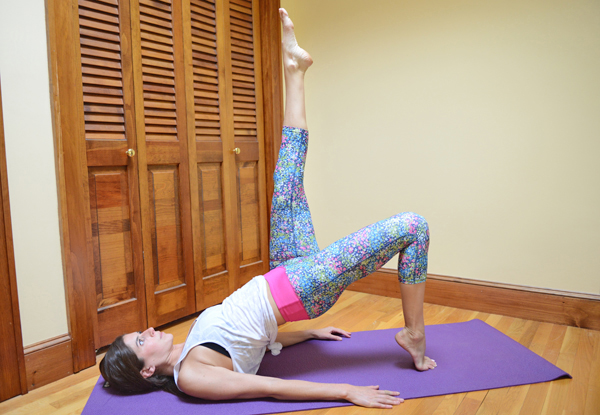
- Hip Bridge Lifts | Lay on your back, arms flat on the ground by your side for support, knees bent and feet flat on the floor. From here, squeeze your glutes and lift your hips a couple inches off the ground so that your butt is hovering. Lift the left leg straight into the air so that only the right foot is planted on the ground. This is your starting position. From here, thrust the hips upward, squeezing your glutes and pressing through the right foot. Hold for a second at the top and then slowly lower hips back down to a hover (try not to rest your bum on the floor).
- Hip Bridge Hold with Drawbridge Leg | Hold the hip bridge at the top and, keeping it straight, lower your left leg so that it’s parallel to the ground and then lift it back up to point towards the ceiling. Continue squeezing that right glute and holding your hips in a lifted bridge position as you do this.
- Hip Bridge Pulses | Hold the top of your hip bridge lift position and pulse up an inch or two and down an inch or two. Focus your attention on the right glute: squeeze, release, squeeze, release.
- Hip Bridge Pulses with Lifted Heel | Same as the previous exercise except you’ll lift your right heel off the ground. You may have to scoot that foot in a little closer to your bum so that you can really get onto the ball of your foot.
*Modification: If it’s too intense holding that non-working left leg straight up in the air, cross the left ankle over the right knee in a figure 4 shape to make the movements easier.
LEFT GLUTE
Repeat sections 1 and 2 on the left side.

WEARING | leggings c/o PRISM Sport (use code ACTPERRY to get 30% off your first order) // lululemon tank (old)
Enjoy your day!
