
DIY Wood Paneling Dos and Don'ts (by Scott)

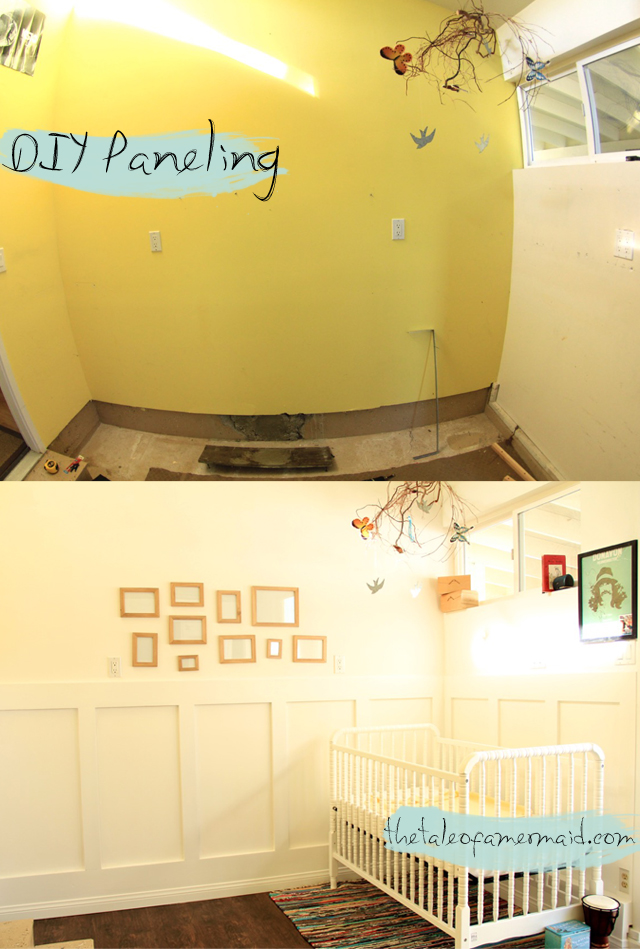
Hi Everyone! Devon asked me to share a little tutorial about how to make this wainscot paneling that I was able to put together for Sprout's room. Although I would not consider myself a carpenter, I really love trying to be one. I read a lot in woodworking magazines and online articles, and am fortunate to work around extremely talented artisans who gave me tips and tricks along the way, and I am happy with the way it turned out. Although is is not necessarily the most professional, clean, perfect paneling, I think it looks cool enough and I am happy to show it to Sprout someday. I will say that there was a lot of staring at a wall during the build, so don't get discouraged if you don't figure something out right away. It takes a lot of planning and a little patience, but I think this is a simple way to get a unique, classic, clean, fresh look to any space.
Thanks for checking it out.
-scott
Materials:
Level
Carpenters Square
Pencil
Measuring Tape
Nail Gun Compressor
Miter Saw
Calking
Wood Filler
Sander
Sand Paper
Stud Finder
Paint (we used Behr Ultra Pure White Plus no VOC in semigloss on wood and flat on walls)
Wood
Top rails: 1” X 6”
Bottom rails: 1” X 8”
Battens: 1” X 4”
Base Molding
*You will need varying amounts of each size of board based on room size.

First, measure the walls, decide how many panels you want, decide on the height of the panels and pick out the wood. *Make sure you get straight boards (not bendy or curvy)


Install the top rail and bottom rails horizontally around the room. Make sure they are level, attach the boards to the wall using the nail gun and try to hit a stud for support. *We had to install nailer boards because we were dealing with concrete (see above picture)

Install the vertical battens: this part is tricky to get the spacing correct. Divide the wall into however many sections you want. Feel free to draw all over the wall because you are going to paint over it anyway. You will need to measure the height of each batten individually as there can be variations in the spacing even if the top and bottom rails are level. This will ensure a tight fit.

Fill all the nail holes and gaps with wood filler and patch any previous nail holes and imperfections on the wall with dry wall patch.


Using wood filler will eliminate variations in the surface when you are ready to paint. Make sure to sand the all the boards for a nice, smooth finish. I started with 150 grit sandpaper and moved to 220 and then finished with 320. I also hooked up a vacuum to the sander to eliminate dust


I had a lot of gaps between the wood and the walls due to imperfections in the wall and I wanted to have the paneling meet flush on the front edge, so I used caulking to fill in the space.


90% of painting is in the preparation. Sanding, caulking, wood filling, sanding again, taping and masking will ensure a clean finish. I used a HVLP Spray Gun with my 6 Gallon Compressor to apply the paint. My compressor was way too small to power the gun for a long period of time. Although it still worked with a lot of patience and noise, I would recommend either a larger compressor or an airless spray gun (both can be rented from home improvement stores).

Also, if I were to do it again, I would not worry about taping off the wall before spraying. It turned out I had to repaint the wall anyway because the tape ripped off the fresh paint on the wall as you can see in the pictures above and below. Next time I would spray the wood first and then paint the wall.


The last step is to add the base molding. Select the base molding you like and attach it with the nail gun. The hard part about this is getting the joints tight in the corners. There was a bit of trial and error: nothing a little caulking won't fix! Nail along the top and bottom to ensure a tight fit against the paneling and floor.

After it was installed and I applied caulking to the gaps, I painted the molding to match the paneling.


p.s. hey guys! It's Devon. The rest of the room is still a work in progress, but we can't wait to show you more soon (and I think you will be as horrified at the before picture as we were). Hope you had a good weekend!
More posts from Devon DeMint