
Giant Macramé Rope Lights
Hope you lovies had a great long weekend! So this tutorial could not be more simple. I am telling you guys, these giant macramé rope lights will change.your.life. they are that good.
So when I say giant, I mean HA-UUGE.. Not just the rope, the light bulbs too.

The knot for this project is as easy as can be. Its a great way to be productive AND watch Netflix because once your hands get the memory down you can sort of go on autopilot.
You’ll need:
Rope or Cording (make sure you use a coupon!)*
Lamp Cord
Socket Kit
Small Vessel (that can be drilled into)
Glue
*So don’t throw things at me, but I’m not sure how much cording to tell you to buy. Let me explain. For the huge rope, I bought 35 yards ($1.49/yd) and it easily covered 15 feet of lamp cord. For the smaller one I bought 40 yards ($.59/yd) and it covered 8 feet. Obviously the thickness plays a massive factor in how far it goes. The good news is that you can use clear tape to connect the ends together if you need to add more and you’ll never see them (also make sure that you use at least a 40% off coupon at JoAnn when you are buying it.)
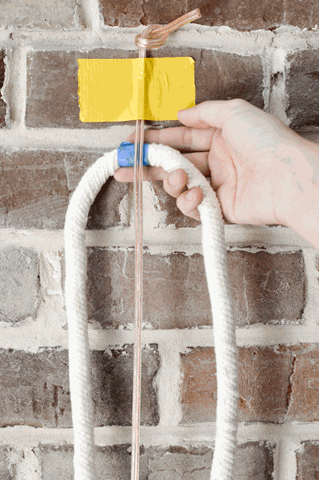
Start by securing your lamp wire. For pictures I have it taped to a wall, in real life you’ll want to tie it around something like a chair back or doorknob to keep it stable.

Find the center of your cording and place it behind the lamp wire.

Take the left side and put it over the front of the lamp wire.

And under the right side of the cord creating a small loop on the left side of your lamp wire.

Then take the right cord and place it behind the lamp wire.

Pull the entire length of it through the small loop that you created on the left side of the lamp wire.


Repeat your little heart out. As you are creating more and more knots the design will start to spiral. As long as you are starting with the left side and taking it over the top of the lamp wire the spiral will go in the same direction. If you take the right side over, or put the left side under the spiral will switch directions and you’ll have to undo the knots.

Pretty soon it’ll start to look like this:

Once all of my knots were done it was time to wire the socket. You can do this before you start knotting if you want, its completely up to you.
For your socket cover you’ll need some sort of cup or planter. For my lights I used a thrifted copper cup and a clearance plastic cup from Target that I spray painted white. But you can use anything! A wooden bowl, a ceramic planter, really the sky is the limit!

Start by drilling a hole into the bottom of your cup.

Then attach the treaded nipple to the socket base (make sure that you tighten the little screw on the side so that your socket doesn’t unscrew when you are twisting the light bulb!)

Put the washer, then the cup, then the socket base onto your lamp wire.


Attach the socket according to the instructions provided.

Then screw the washer onto the threaded nipple.

Slide your rope up (this the the only adjustment that you wont have to do if you wire your socket before you start on your knots) and around the end of the threaded nipple. Glue in place.

Ta Da!!

Now for the details on the giant light bulbs. Man oh man are they the stuff of legend.
I found them at a light bulb store when we were in LA but after some internet sleuthing, I found the best prices at School House Electric (way better than what we got them for)
Did I mention that they are massive?
A photo posted by Schoolhouse Electric (@schoolhouse) on Jun 24, 2015 at 9:57am PDT
So here is the thing. A light blub that big, its not just a bulb. Its the entire light. So while they aren’t cheap (around $40.00) they are freaking showstoppers.


Seriously though, can you imagine how fantastic 3 or 4 grouped together would be? I might just have to make that happen….
