Free Japanese Pattern (With English Instructions!)
Today I want to introduce you to Rin, of Sew in Love! She's a gorgeous, half-Japanese blogger living in Australia with her husband (raise your hand if you wouldn't mind your husband speaking with an Australian accent...just saying) and she has such great style. I love this t-shirt makeover and adoooore this men's t-shirt makeover she did. SO cool looking, totally doing it. Today she's showing us how to read/understand this really adorable japanese pattern for a little girl's pom pom dress. I've always loved the look of Japanese patterns (who doesn't?) but a lot of them are in, ya know, Japanese. The pattern is free, so after you've downloaded it, with Rin's instructions right here on the blog you should have no problem making it! Yay! Thanks, Rin!
Here she is:
Hello! My name is Rin, and I'm so excited to be visiting today from my sewing blog, Sew in Love (http://www.sewinlove.com.au/). I love all things handmade, especially dressmaking and knitting!
My Mom is Japanese, so I've always been fascinated with the simplicity of Japanese sewing patterns. I love them so much, that I even wrote a book about them, called How to Sew Japanese Sewing Patterns!
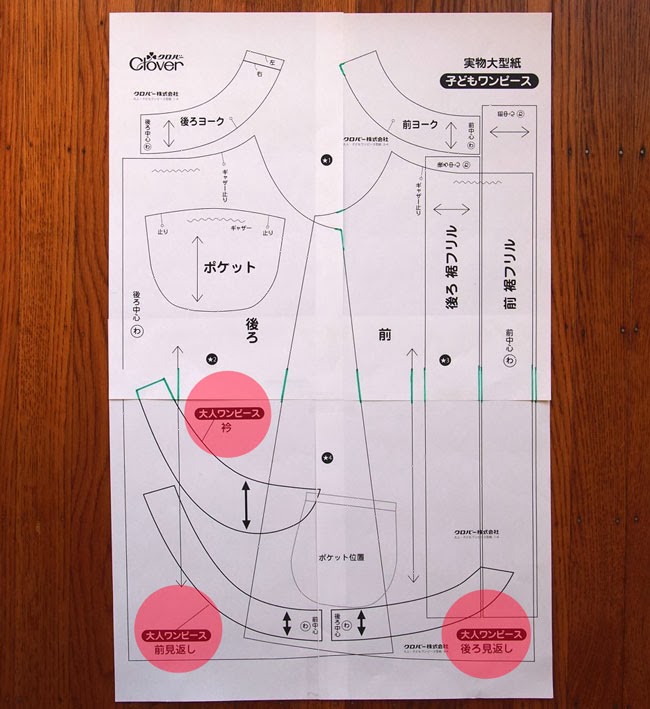
I came across this free sewing pattern for mother-and-daughter floral dresses on a Japanese website, and immediately thought of Disney and Paige! The sewing pattern is by Clover (http://www.clover.co.jp/recipe/detail/post_257.html), the craft supplies company. I have translated for you this wonderfully simple, pom-pom dress for little girls. Combined with Clover's step-by-step illustrations and my English translations and photos, I really hope you can enjoy sewing a Japanese pattern :-)

DOWNLOAD SEWING PATTERN HERE (http://www.clover.co.jp/recipe/c282kodomowanpi.pdf)
* Size
Japanese children's size 100cm - This means the dress fits a little girl who's height is 100cm (39 inches or 3'3").
* Printing and Tracing the Pattern
Once you have downloaded the Pom-pom Dress Sewing Pattern from Clover, you need to print it on either A4 or Legal Size paper.
Join the four pages of the sewing pattern together by matching up the numbers with the star symbols.
Trace all the pattern pieces except for the 3 pieces I've circled below in RED, they are for the adult dress.

You should end up with 7 pieces: Front dress, Back dress, Front yoke, Back yoke, Front frill, Back frill and Pocket.

* Cutting Fabric
The pattern DOES NOT include a seam allowance. Please add them before cutting out your fabric by following the drafting diagram. All seam allowances are 1cm (0.4") unless stated in the diagram. For example, the Front dress and Back dress both require 1cm seam allowance on all edges, except for the armhole which needs only 0.5cm (0.2").

You also need to make bias tape of two different widths: 12mm (0.5") and 18mm (0.7"). Remember, the strips of fabric need to be double the width of the final bias tape width. Which means you need to cut strips of fabric which are 24mm (1") and 36mm (1.5").
* Materials
- Floral cotton fabric - 110cm x 80cm (43" x 31.5") - Plain cotton fabric - 110cm x 15cm (43" x 6" - Small snap buttons x 2 - Fusible interfacing - 60cm x 12cm (24" x 5") - Pom-pom trim - 100cm (approx. 1 yd)
* Sewing Instructions
The sewing pattern comes with good, detailed illustrations. Please follow each English translation along with the illustrations in the sewing pattern download.
- Step 1
Sew gathering stitches along the neckline of the Front and Back dresses. Make sure you keep within the seam allowance and the lines marked on the sewing pattern.
- Step 2
Make the pocket. Zig-zag stitch along the bottom curved edge. Gather the top opening of the pocket and finish the edge with the 18mm (0.7") bias tape. Stitch pom-pom trip over the bias tape. Attach pockets to the Front dress.

- Step 3
Right sides facing, stitch the side seams of the Front and Back dresses. Zig-zag the seams and press towards the back.
- Step 4
Use the 12mm (0.5") bias tape to finish the armholes.
- Step 5
Make the yoke. Trim 1cm (0.4") from one edge of the Back yoke.

Press interfacing on wrong side and stitch the edges of each Front and Back yoke pieces together. You should end up with two yokes which are mirror images to each other.

Right sides facing, stitch the edges of the yoke as marked on the sewing pattern. You should end up with two gaps in the yoke.

- Step 6
Gather the neckline of the Front and Back dresses to fit the gaps in the yoke. Pin and stitch on the yoke's seam.


- Step 7
Overstitch along the yoke, keeping very close (about 2mm or 0.07") from the outer edge. Attach the pom-pom trim and the two snap buttons.

- Step 8
Make the frill. Right sides facing, sew the side edges of the Front and Back frills together. Press seams open. Hem the bottom edge.
Gather top edge of frill and attach to the dress. Zig-zag along the seam. Press the seam upwards and overstitch from the right side of the dress. Again, keep very close to the from the edge of the dress (about 2mm or 0.07"). Finished!

I've also translated the adult dress, which has a Peter Pan collar and a drawstring waist. It's (almost) as cute as this little girls' pom-pom dress! The free Peter Pan collar dress sewing pattern is up on my new website, Japanese Sewing Patterns (http://www.japanesesewingpatterns.com/free-sewing-patterns/2014/01/18/free-japanese-sewing-pattern-in-english-peter-pan-collar-floral-dress.html).

If you need any help with these patterns, please, please comment here or message me on Facebook! I would love to help!
Thanks Disney for letting me visit today. Have a wonderful day everyone!
xx Rin
Thanks again, so much, Rin! You are so sweet for taking the time to do this for all of us. Everyone please be sure to check out Rin's e-book! And have a really great day. :O) Love, Disney